Overview
In this blog let us discuss API Management For SOAP APIs(WebServices) using Mule.
By the end of this post, we would have learned how to develop SOAP Web Services using Mule, deploy it on Anypoint Runtime Manager and manage the deployed Web Services using Anypoint API Manager by applying policies.
Use Case
Let us develop a simple Web Service to retrieve a list of products. As part of the use case, the following will be covered –
- Create a WSDL file and upload it to Anypoint Exchange
- Develop the application using Mule SOAP Router
- Deploy the application to Anypoint Runtime Manager
- Manage the deployed API using Anypoint API Manager and apply policies
Prerequisites
Before we start building the sample application, some familiarity with the following concepts is recommended –
- WSDL (Web Service Definition Language)
- SOAP Web Services
Create WSDL
The WSDL file is basically the contract (similar to RAML/OAS for REST APIs) which defines the set of endpoints and their corresponding request and response schema.
Below is the WSDL for our use case. Copy the contents to a file called calculator.wsdl
<wsdl:definitions   xmlns:soap="http://schemas.xmlsoap.org/wsdl/soap/"   xmlns:wsu="http://docs.oasis-open.org/wss/2004/01/oasis-200401-wss-wssecurity-utility-1.0.xsd"   xmlns:soapenc="http://schemas.xmlsoap.org/soap/encoding/"   xmlns:tns="http://localhost"   xmlns:wsa="http://schemas.xmlsoap.org/ws/2004/08/addressing"   xmlns:wsp="http://schemas.xmlsoap.org/ws/2004/09/policy"   xmlns:wsap="http://schemas.xmlsoap.org/ws/2004/08/addressing/policy"   xmlns:xsd="http://www.w3.org/2001/XMLSchema"   xmlns:msc="http://schemas.microsoft.com/ws/2005/12/wsdl/contract"   xmlns:wsaw="http://www.w3.org/2006/05/addressing/wsdl"   xmlns:soap12="http://schemas.xmlsoap.org/wsdl/soap12/"   xmlns:wsa10="http://www.w3.org/2005/08/addressing"   xmlns:wsx="http://schemas.xmlsoap.org/ws/2004/09/mex" targetNamespace="http://localhost"   xmlns:wsdl="http://schemas.xmlsoap.org/wsdl/">
  <wsdl:types>
    <xsd:schema targetNamespace="http://localhost" elementFormDefault="qualified" >
  <xsd:element name="Add">
    <xsd:complexType>
      <xsd:sequence>
        <xsd:element minOccurs="0" name="a" type="xsd:int" />
        <xsd:element minOccurs="0" name="b" type="xsd:int" />
      </xsd:sequence>
    </xsd:complexType>
  </xsd:element>
  <xsd:element name="AddResponse">
    <xsd:complexType>
      <xsd:sequence>
        <xsd:element minOccurs="0" name="result" type="xsd:int" />
      </xsd:sequence>
    </xsd:complexType>
  </xsd:element>
    </xsd:schema>
  </wsdl:types>
  <wsdl:message name="ICalculator_Add_InputMessage">
    <wsdl:part name="parameters" element="tns:Add" />
  </wsdl:message>
  <wsdl:message name="ICalculator_Add_OutputMessage">
    <wsdl:part name="parameters" element="tns:AddResponse" />
  </wsdl:message>
  <wsdl:portType name="ICalculator">
    <wsdl:operation name="Add">
      <wsdl:input wsaw:Action="http://localhost/ICalculator/Add" message="tns:ICalculator_Add_InputMessage" />
      <wsdl:output wsaw:Action="http://localhost/ICalculator/AddResponse" message="tns:ICalculator_Add_OutputMessage" />
    </wsdl:operation>
  </wsdl:portType>
  <wsdl:binding name="DefaultBinding_ICalculator" type="tns:ICalculator">
    <soap:binding transport="http://schemas.xmlsoap.org/soap/http" />
    <wsdl:operation name="Add">
      <soap:operation soapAction="http://localhost/ICalculator/Add" style="document" />
      <wsdl:input>
        <soap:body use="literal" />
      </wsdl:input>
      <wsdl:output>
        <soap:body use="literal" />
      </wsdl:output>
    </wsdl:operation>
  </wsdl:binding>
  <wsdl:service name="CalculatorService">
        <wsdl:port name="ICalculator" binding="tns:DefaultBinding_ICalculator">
            <soap:address location="http://localhost/ICalculator" />
        </wsdl:port>
  </wsdl:service>
</wsdl:definitions>
Implement Calculator Service
Let us implement our calculator service using Anypoint studio.
- Create a new Mule project and enter a project name
- Select From Design Centre or local files tab
- Click on the Browse icon and select Browse files
- Select calculator.wsdl and create the new project
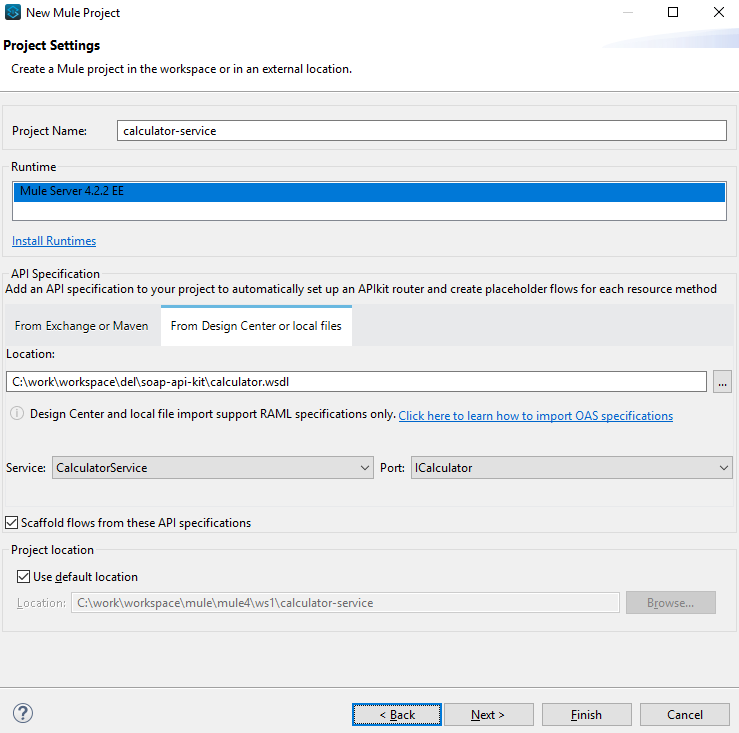
Once the project generation is complete, a mule configuration file will be generated with SOAP Router and flow with Add service.
Implement the Add service to return addition of given 2 numbers as shown below

Deploy Calculator Service
Export the project as a Mule deploy-able archive.
Right Click on the project -> Export -> Anypoint Studio Project to Mule Deployable Archive and generate the jar file
Let us deploy this jar file to Anypoint Runtime Manager –
- Login to Anypoint Platform
- Navigate to Runtime Manager and select an appropriate environment
- Click on Deploy Application
- Enter the name for deployment. Eg: calculator-service
- Select CloudHub as the deployment target
- Upload the generated jar from file from the target directory
- Click on Deploy Application

Lets test our deployed service. We will be using SoapUI client to test our service, but any other similar clients can also be used –
- Copy the App Url of the deployment from
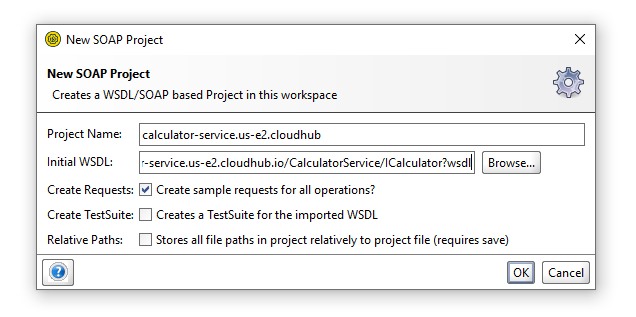
Runtime Managerand append it with /CalculatorService/ICalculator?wsdl. In our case its http://calculator-service.us-e2.cloudhub.io/CalculatorService/ICalculator?wsdl - Open SoapUI, navigate to File -> New SOAP Project
- Provide the WSD url in Initial WSDL column and click on ok as shown below
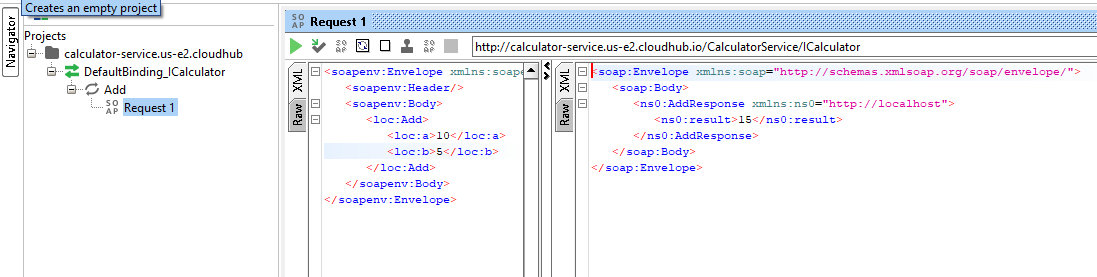
- Open the
Add requestand test the service as shown below
With this, we have implemented, deployed and tested our SOAP Web Services successfully.
Let us move on to see how to apply policies for our Calculator application.
Create Asset in Exchange
- Login to your Anypoint account
- Navigate to Exchange
- Click on Publish new asset
- Enter the name for assets. Eg: Calculator Service
- Select SOAP API – WSDL asset type
- Upload calculator.wsdl and publish the asset

Manage API using API Manager
- Navigate to API Manager
- Click on
Manage API->Manage API from Exchange - Search for the API name we just created and save the changes
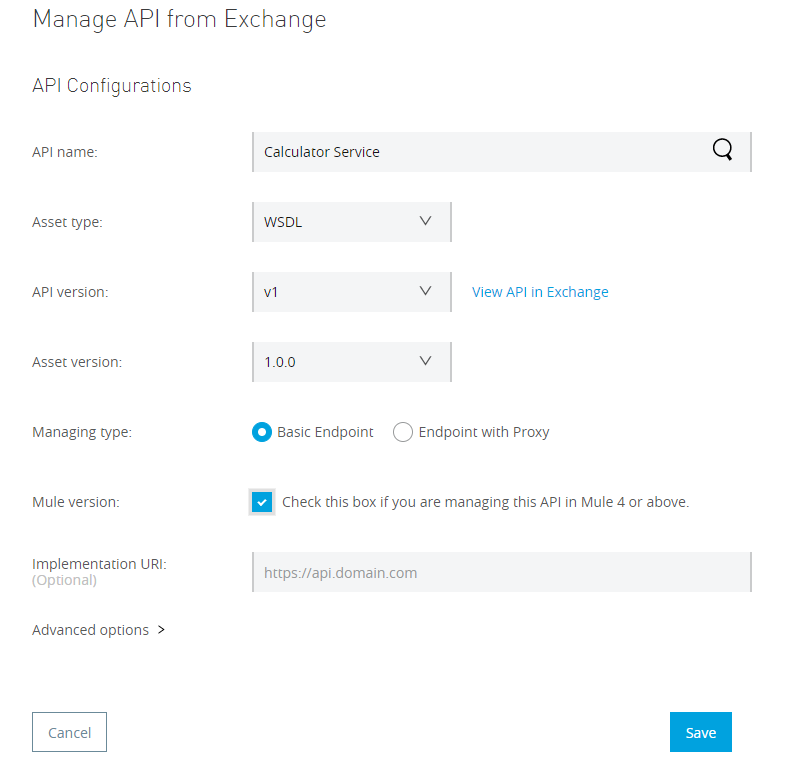
Now we should have a new version of our SOAP API as shown below:

Apply Policies
Let us add a policy to secure our API so that any user calling the API should provide username and password (Basic Authentication) to get the results –
- Click on version v1
- Navigate to Policies
- Click on Apply New Policy
- Select
Client ID enforcement policy - Set
Origin of the Client ID and Client Secret credentialsto HTTP Basic Authentication Header and Apply the changes
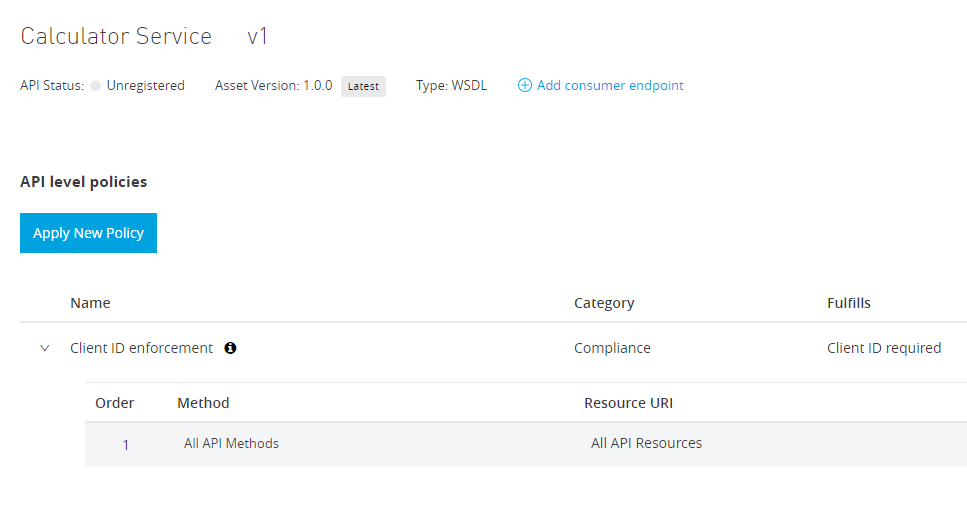
Navigate to settings and copy the Autodiscovery API ID, which we will be using in the next section.
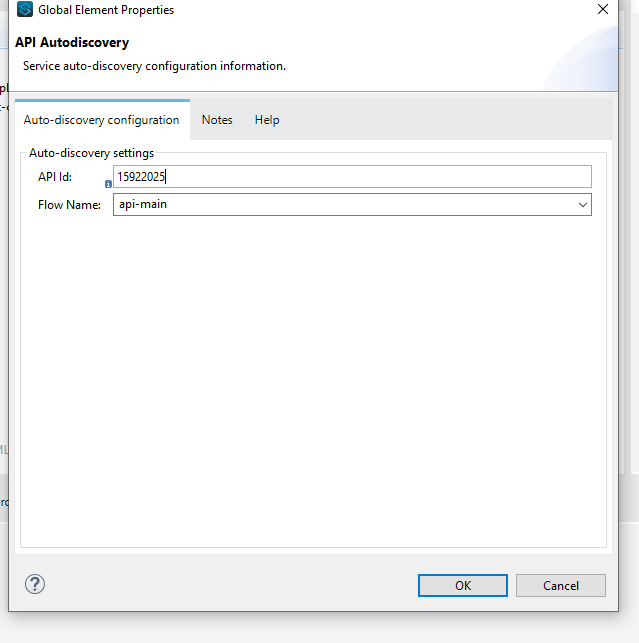
Configure API Auto Discovery
Auto Discovery should be configured in our application to enable our deployment to register against the API policy we just created. In order to do this, we need to update our application by adding a API Auto Discovery configuration –
- Go back to studio and edit calculator-service.xml (Auto-generated XML from WSDL)
- Navigate to Global Elements and click on Create
- Search for Autodiscovery and select the element
- Key in the copied API ID and select
api-mainas Flow Name
- Save all changes and rebuild the application (Right-click on the project ->
Export->Anypoint Studio Project to Mule Deployable Archiveand regenerate the jar file ) - Navigate to
Runtime Managerand upload the new jar and wait for the application to redeploy
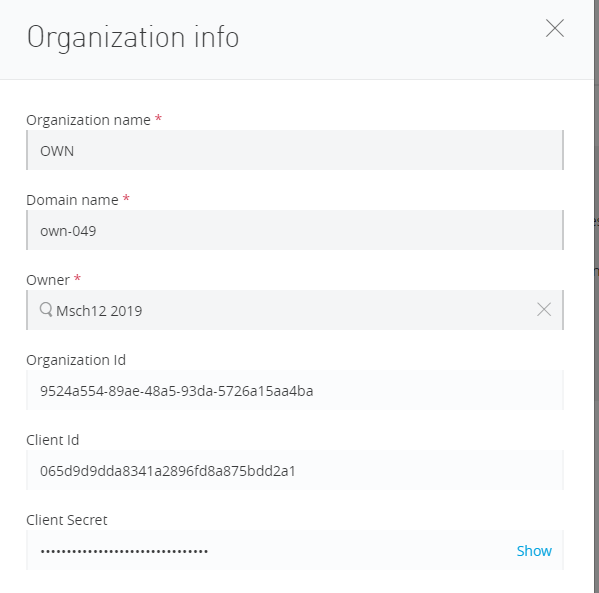
It is required to configure the Organization’s Client Id and Secret as part of our application properties. Without this, the application will not be registered against the policy.
Follow the below steps to retrieve and add Organization’s Client ID and Secret
- Navigate to Access Management
- Click on your Organization name and copy the
Client IDandSecret
Configure Properties
- Navigate to Runtime Manager
- Click on our calculator-service application
- Navigate to Settings and click on the properties tab
- Add the below properties after replacing your client id and secret
anypoint.platform.client_id=<CLIENT ID - REPLACE>
anypoint.platform.client_secret=<CLIENT SECRET - REPLACE>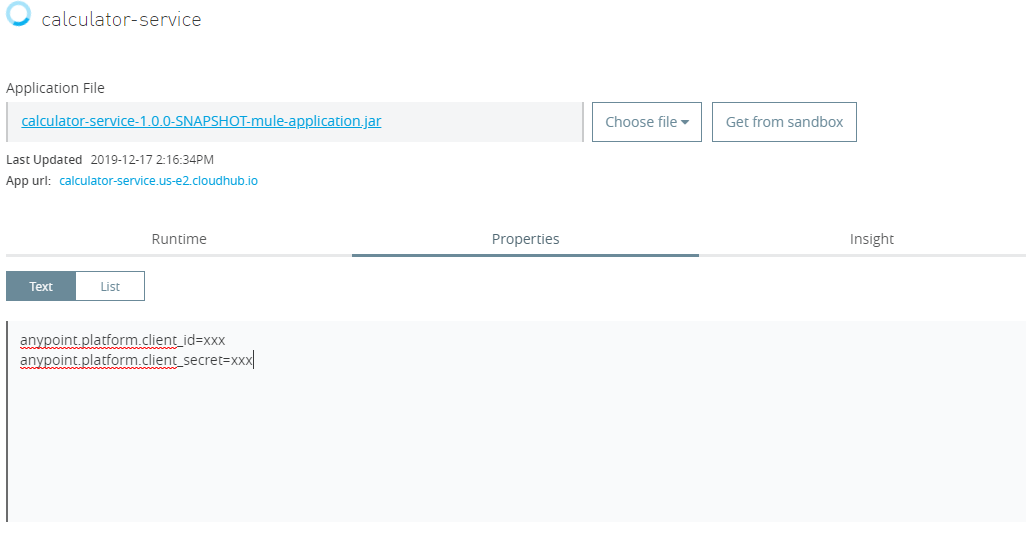
- Finally, click on Apply changes and wait for the application to redeploy the application
Test Application
Let us go back to SoapUI and invoke the same service again, but this time we should see a 401 unuthorized error as per the policy configuration.

So, our policy allows requests only with Basic Authentication. In the next section lets request for a username (Client Id) and password (Client Secret) for our application
Request Client Id and Secret for Basic Authentication
- Navigate to Anyoint Exchange
- Search for Calculator Service and click on the asset
- Click on the ellipse icon and choose Request Access

- Select an existing Client Application or create a new one
- Select the API instance that we created in API Manager
- Click on Request Access
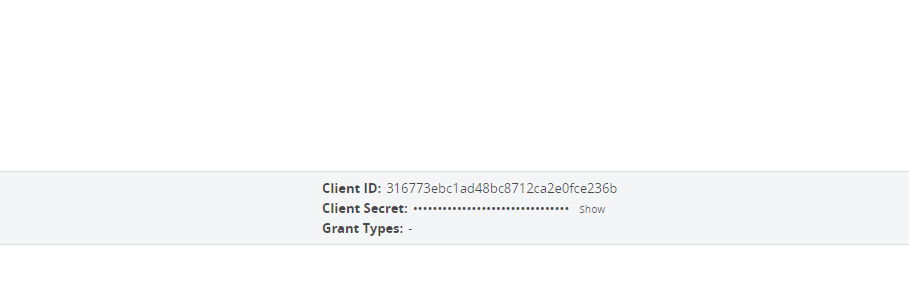
- Copy the generated client id and secret
Test Application
Let us try to invoke the service again but with Client Id and Secret this time. In SoapUI Request window –
- Click on Auth tab
- Select Add new Authorization from the Authorization dropdown
- Select Basic Type and click on ok
- Paste the Client Id copied earlier in the Username field
- Paste the Client Secret copied earlier in Password field
- Select Authenticate pre-emptively
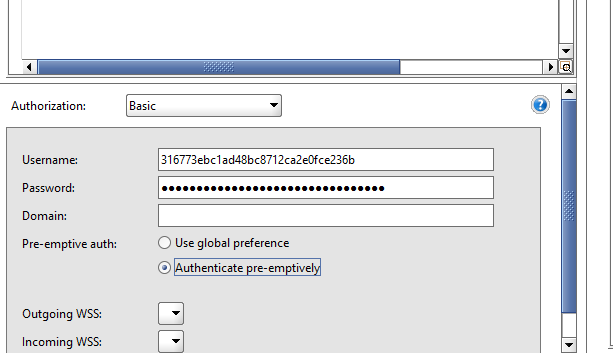
Finally, invoke the request again and this time we should get a valid response as below:

Summary
This article is dedicated to elucidating how to implement SOAP Web Services using Mule, deploy the application to Anyoint Runtime Manager and manage the API by applying policies using Anyoint API Manager.
Hope you found this article interesting, do drop us a comment below with your inputs, views, and opinions regarding API Management For SOAP APIs(WebServices).
Also, if you are interested in learning more about an exciting new code quality product that reduces your Mule project costs by 79%, follow the below link :
Discover more from Integral Zone
Subscribe to get the latest posts sent to your email.