Overview
This blog explains how external applications can connect and consume Anypoint Platform APIs using the new Connected Apps feature.
Using Connected Apps, users can delegate their access to external applications without sharing their credentials. Delegated access can be revoked by the user at any point.
Anypoint platform uses OAuth 2.0 and OpenID Connect to authorize external applications to access data on behalf of the user.
Use Cases
Web Applications – Applications include development of SSO (Single Sign On) or mobile apps. Integration in this case will include OAuth grant type authorization_code
Back-end Applications – Applications include server-server integrations. For example, development of CICD processes to deploy applications to a Runtime manager. Integration in this case will include OAuth grant type client_credentials
Example Scenario / Use Case
In this post lets look at a simple example which demonstrates Web Applications use case using Connected Apps.
Lets develop a simple Web Application to get authorization from the user to query Exchange Assets on behalf of users using Connected Apps. We will be using Web (basic HTML & Javascript) and Server components to complete this exercise.
- Web –
- Login Screen – User will be redirected to Anypoint Platform Login. On successful login, a user authorizes the application to access the Anypoint Platform APIs on behalf of the user.
- Exchange Assets List Screen – In this screen we will be using the access-token generated from the server component to query assets from Anypoint Exchange and display the retrieved list.
- Server –
- Once the user authorizes our application to access the APIs we get an authorization code from Anypoint Platform. We need to exchange this authorization code with access token to call Anypoint Platform APIs.
- So in our server component lets develop a simple API to – “Receive the request from Web -> Exchange the authorization code with Access Token -> Return the response back to web”.
Assumptions
Before we start building the sample application, some familiarity with the following frameworks is recommended:
- OAuth 2.0
- Node.js – Which we will be using to develop web and server parts of our application (should be installed).
- Express – Minimalist web framework for Node.js
- jQuery – JavaScript library for our web application
Sequence Flow
Sequence flow diagram for the scenario –

Creating Connected App
Create a Connected App in Anypoint Platform by navigating to Access Management -> Connected Apps -> Create App. Create a new app with the following details

Name– Name of the connected appType– As our web application acts on behalf of the user, we use Authorized by user option.Grant Type– As discussed earlier we will be using Authorization Code . Refresh Token grant type will be discussed in the later part of the blog.Website URL– Link to your web siteRedirect URIs– URL which will be invoked on successful login & user consent along with authorization code.
Finally click on Add Scopes button and assign appropriate scopes. Lets use Full Access scope for our demo.

Note – In the actual app it is recommended not to request Full Access until it is really required. Users may deny to grant access to such applications. It is always better to request the appropriate scope required by the application.
Finally our first Connected App should be created and the corresponding client_id and client_secret should be available for development –

Development
Let’s start with our application development
Project Setup
As discussed earlier, we will be using Node.js to develop our application. Execute the below command from a terminal in an empty directory to initialize the project –
> npm initAccept the defaults and you should have the package.json file in the directory at the end of this step.
Let’s create directories for web & server components and a empty Node.js main file (index.js) to start the server as shown below.
connected-apps-demo
   |-> web/
        |-> login/
        |-> asset-list/
   |-> server/
   |-> index.js
   !-> package.json
Add the following dependencies to package.json
{
  "name": "connected-apps-demo",
  .....
  .....
  "dependencies": {
    "body-parser": "^1.19.0",
    "express": "^4.17.1",
    "request": "^2.88.0"
  }
}
Run the following command from the same terminal
npm installAdd the following code to index.js file. This is to start our web server.
const express = require('express')
const app = express()
const request = require('request')
const bodyParser = require('body-parser')
const port = 3000
app.use(bodyParser.json())


app.use(express.static('web'))

app.listen(port, () => console.log(`Example app listening on port ${port}!`))
Web – Login Screen
Create a file called index.html in connected-apps-demo/web/login directory and paste the below HTML contents and replace CLIENT_ID with the actual client_id generated in the Anypoint Connected Apps screen.
<!DOCTYPE html>
<html>
<head>
<link rel="stylesheet" href="https://maxcdn.bootstrapcdn.com/bootstrap/4.0.0/css/bootstrap.min.css">
</head>
<body>
<div class="container"> <div class="row text-center mt-5"> <div class="col"> <h2>Anypoint Platform</h2>
<h5>Connected Apps Demo</h5>
</div> </div> <div class="row text-center mt-4"> <div class="col">
<button type="button" id="anypoint_signin" class="btn btn-light btn-lg pl-5 pr-5"><img src="https://blogs.mulesoft.com/wp-content/themes/simplixity-mulesoft/img/favicon/favicon-32x32.png"> Sign in with Anypoint Platform</button> </div> </div>
</div>
<script src="https://code.jquery.com/jquery-3.4.1.min.js"></script>
<script>
let clientId = 'CLIENT_ID';
let redirectURI = 'http://localhost:3000/asset-list';
let state = Math.random().toString(36).substring(7);
$('#anypoint_signin').on('click', function() {
window.location.href = `https://anypoint.mulesoft.com/accounts/api/v2/oauth2/authorize?response_type=code&client_id=${clientId}&redirect_uri=${redirectURI}&scope=full&state=${state}&prompt=true`;
});
</script>
</body>
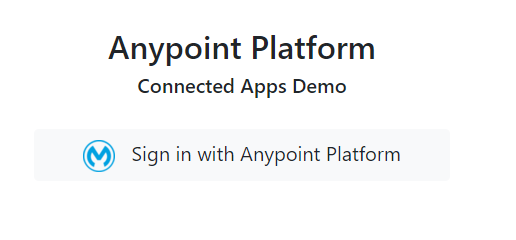
</html>Let’s start the web server and check the login screen. To start the server execute the below command from terminal
> node index.js
Example app listening on port 3000!
Once the server is up navigate to http://localhost:3000/login in your browser. You should now see the login screen as below
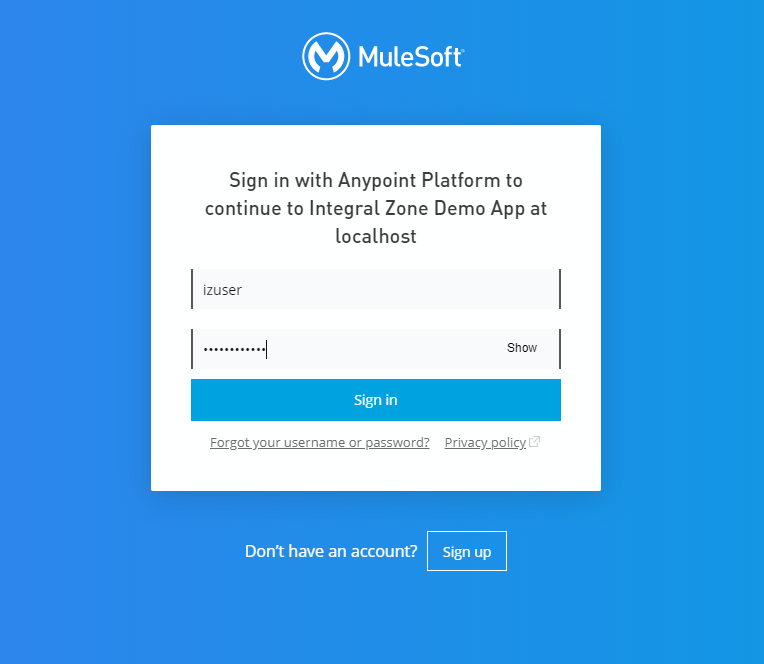
Let’s click on Sign in with Anypoint Platform which would redirect us to Anypoint Platform login ( https://anypoint.mulesoft.com/login ). Once logged in, we should also see a consent screen which shows the list of scopes requested by our application (the scopes that we requested while creating the Connected App).
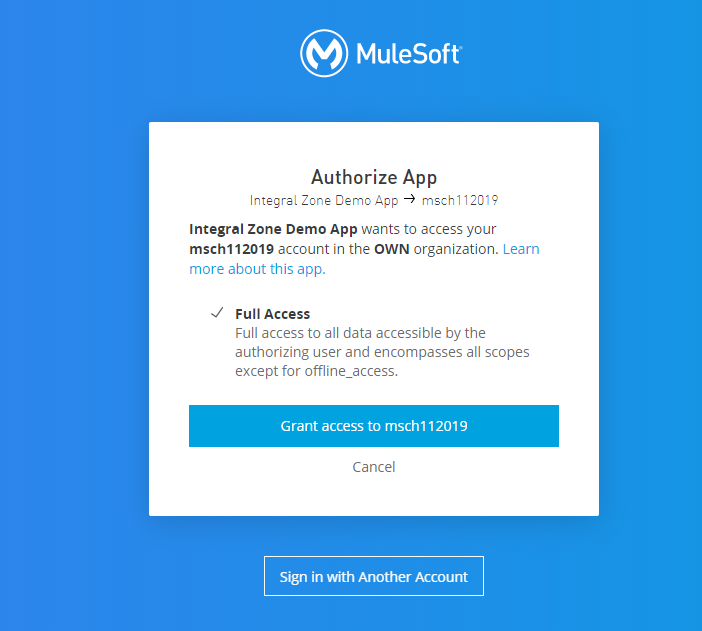
Once we click on Grant access to account, we will be redirected to our application on the URI configured in the Connected App i.e. http://localhost:3000/asset-list with an authoriation code. So, lets develop a screen which listens on the configured redirection URI.
Web – Exchange List Assets Screen
In this screen we will capture the authorization code and exchange it with a access token which in-turn can be used to call Anypoint Platform APIs to get the asset list from the Exchange.
Create a file called index.html in connected-apps-demo/web/asset-list directory and paste the following code –
<!DOCTYPE html>
<html>
<head>
	<link rel="stylesheet" href="https://maxcdn.bootstrapcdn.com/bootstrap/4.0.0/css/bootstrap.min.css">
</head>
<body>
<div class="container">
  <div class="row text-center mt-5">    <div class="col">      <h2>Anypoint Platform</h2>      <h5>Connected Apps Demo</h5>    </div>  </div>
  <div class="row text-center mt-4 no-gutters">    <div class="col">		<ul class="list-group text-left">		  <li class="list-group-item"><b>Authorization Code</b></li>		  <li class="list-group-item"><b>Access Token</b></li>		</ul>	    </div>
  <div class="col">		<ul class="list-group text-left">		  <li class="list-group-item" id="authorization_code">...</li>		  <li class="list-group-item" id="access_token">...</li>		</ul>	    </div>  </div>
  <div class="container">  <div class="row mt-3">    <div class="col">      <h5>Exchange Assets List</h5>	  <table class="table">		<thead>			<tr>				<th>Name</th>				<th>Version</th>				<th>Created By</th>				<th>Rating</th>			</tr>		</thead>		<tbody id="assets_list">					</tbody>	  </table>    </div>  </div>
</div>
<script src="https://code.jquery.com/jquery-3.4.1.min.js"></script>
<script>

$(function() {
        // Extract Authorization Code
	let urlParams = new URLSearchParams(window.location.search);
	let code = urlParams.get('code');

	// Exchange Token
	$.ajax({
		  type: "POST",		  contentType: "application/json; charset=utf-8",		  url: "/exchangeToken",
		  data: JSON.stringify({
			code: code
		  }),
		  dataType: "json",		  success: _onExchangeTokenSuccess,		  error: _onError
		});

	$('#authorization_code').text(code);

	function _onExchangeTokenSuccess(data) {
		populateAssets(data.access_token); 		$('#access_token').text(data.access_token);
	}

	function _onError(xhr, ajaxOptions, thrownError) {
		console.log(xhr.statusText);
	}

	function populateAssets(accessToken) {
		// Get Assets from Exchange
	    $.ajax({
		  type: "POST",		  contentType: "application/json; charset=utf-8",		  url: "/assetsList",
		  headers: {
			authorization: 'bearer '+accessToken
		  },
		  data: JSON.stringify({
			access_token: accessToken
		  }), 		  dataType: "json",		  success: _onAssetsSuccess,	  error: _onError
		});

		function _onAssetsSuccess(data) {
			let dataHtml = ''
			$.each(data.data.assets, function(i, asset) { 				dataHtml += `<tr><td>${asset.name}</td><td>${asset.version}</td><td>${asset.createdBy.firstName}</td><td>${asset.rating}</td></tr>`			})
			$('#assets_list').html(dataHtml);
		}
    }

})
</script>
</body>
</html>
Now we have completed the front-end development of our application. Let’s move on to back-end implementation of our application.
Server – Exchange Autorization Code with Access Token
Here we will be developing an API to receive the authorization code and exchange it with an access-token by invoking Anypoint Platform token API. Create a file called exchange-token.js in connected-apps-demo/server directory and paste the below code. Replace the CLIENT_ID and CLIENT_SECRET with appropriate values generated in the Anypoint Connected Apps screen. Refer Token Flow for more information
const request = require('request')

module.exports = function(app){
  app.post('/exchangeToken', function (req, res, next) {
	request.post({
		url: 'https://anypoint.mulesoft.com/accounts/api/v2/oauth2/token',
	    form: {
			grant_type: 'authorization_code',
			client_id: 'CLIENT_ID',
			client_secret: 'CLIENT_SECRET',
			code: req.body.code,
			redirect_uri: 'http://localhost:3000/asset-list'
		}
	}, function (err, httpResponse, body) {
		if(err) {
			next(err)
		}
		res.send(body)
	})
})
}
Server – Query Assets from Exchange
Here we will be developing an API to query the Anypoint Exchange for assets using the access-token retrieved from the above step. Create a file called assets-list.js in connected-apps-demo/server directory and paste the below code.
const request = require('request')

module.exports = function(app){
  app.post('/assetsList', function (req, res, next) {
	var options = {
	  uri: 'https://anypoint.mulesoft.com/graph/api/v1/graphql',
	  method: 'POST',
	  headers: {
		'content-type': 'application/json',
		'authorization': 'bearer '+ req.body.access_token
	  },
	  json: {
		"query": "{assets(query: {searchTerm: \"exchange\", offset: 20, limit: 10}) {groupId,assetId,version,name, rating, createdBy { firstName, lastName }}}"
	  }
	};
	request(options, function (error, response, body) {
	  if (!error && response.statusCode == 200) {
		  res.send(body)
	  }
	  next(error)
	});
})
}
Finally include both the APIs in the main index.js file as shown below
...
...
app.use(bodyParser.json())

require('./server/exchange-token')(app);
require('./server/assets-list')(app);

....
....
Restart the server to get the latest changes up and running. Execute the below command from the terminal in which you started the server earlier
Example app listening on port 3000!
^C [Control + c]
> node .
Navigate to http://localhost:3000/login in your browser -> Follow the Login process -> Authorize the access to application. Once done you should see the below screen
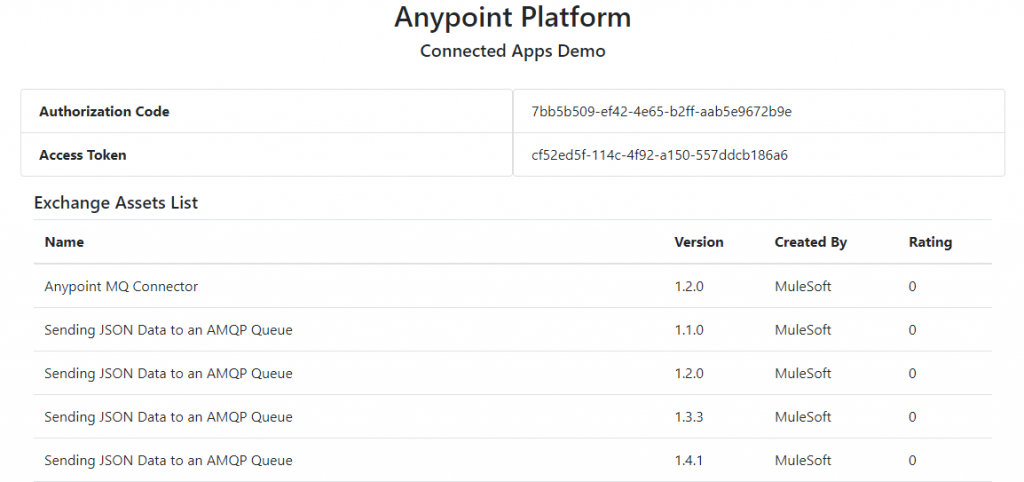
NOTE – Authorization Code and Access Token are just displayed for the purpose of demo.
You have successfully exchanged the access-token and retrieved the assets from Exchange.
Refresh Tokens / Background Access
In further section of the post, let’s discuss the refresh-token and background-access concepts
Access tokens are short lived and expire after a time interval, you will have to get the user consent again and generate a new access token. This is where refresh tokens will be useful, using the refresh token you can generate a new access token without consent from the user.
Refresh tokens are long lived and can be used in cases where we need to perform some actions when the user is not logged in. For more information on Refresh token validity refer OIDC Endpoints & Tokens
Enable Background Access
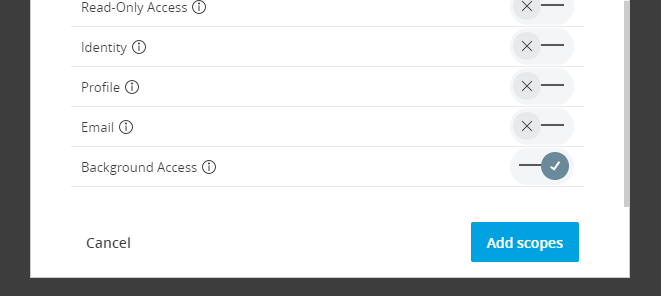
Login to Anypoint Platform and navigate to Access management -> Connected Apps -> Click on the Integral Zone Demo App -> Click on Add Scopes
Check the Background Access scope and save the changes –
Include Offline Access scope
We need to include offline_access scope in the initial OAuth request. Lets edit the connected-apps-demo/web/login/index.html file and include offline scope as shown below. For more information on available scopes refer Endpoint Scopes
...
window.location.href = `https://anypoint.mulesoft.com/accounts/api/v2/oauth2/authorize?response_type=code&client_id=${clientId}&redirect_uri=${redirectURI}&scope=full offline_access&state=${state}&prompt=true`;
...
With offline_access enabled, when the authorization code is exchanged with a token, we get access-token along with a refresh-token as shown below
{
"access_token":"6f5a81bc-afbf-4455-a89f-cd3fe9eeee39",
"refresh_token":"cf212abb-0755-44bc-ab6c-9457ba1ef817",
"id_token":"...",
"token_type":"bearer"
}
Once the access-token is expired we can use the refresh-token to generate a new access-token using refresh_token grant type. For more details in how to invoke the API refer OIDC Tokens.
Conclusion
We have seen how Anypoint Connected Apps can be used to develop a simple web application or integrate it with existing applications.
Connected Apps can also be integrated with web applications following Open WC Project standards using the modules provided by MuleSoft. For more information refer Developer Playground.
Discover more from Integral Zone
Subscribe to get the latest posts sent to your email.